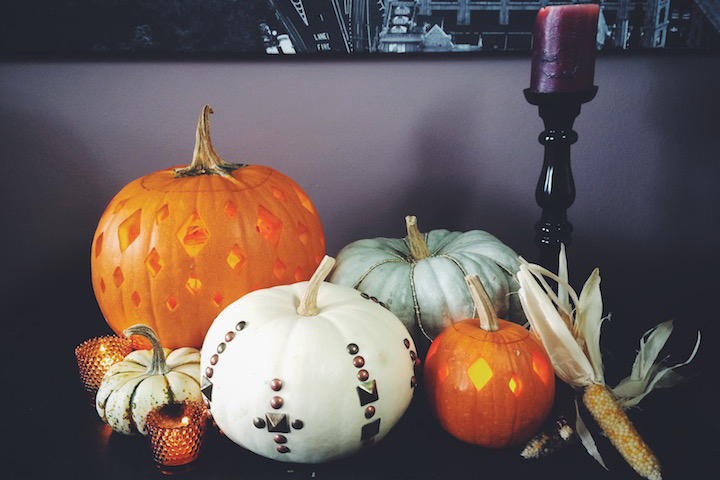
If I’m going to be totally honest, I have some seriously mixed feelings about holiday decorating. On one hand, getting festive can be a fantastic way to be creative and mix up your surroundings; especially if you live in a place where there aren’t really actual seasons. On the other hand, this can all too easily turn into a synthetic, tacky display that ruins an existing motif rather than complimenting it. Luckily, because fall is just so awesome in general, this time of year offers ample opportunities to keep your decor natural and gorgeous. During my visit to Underwood Family Farms earlier this month, I made sure to grab a small assortment of pumpkins and gourds to bedeck my apartment.

While this added a nice organic touch, as the end of the month has been approaching I’ve found myself feeling a little bit robbed of one of my favorite childhood pastimes, pumpkin carving. I hadn’t done it earlier because, the older I get, the more the outcome of the typical corny smiling face has lost its appeal. After thinking a bit, I finally decided to spice up my pumpkins in an untraditional way, that will keep things classy well into November.
Beads

For my First pumpkin I decided to simply add beads to enhance the unique color and shape of this particular pumpkin. You can definitely go with any type or color of bead that you wish, though I would try to stick with something that has a round middle. This will make it easier for the string to settle into the natural cleavage of the pumpkin.
I found these beads at Michael’s. I was lucky enough to find the kind that already come in a loop, making things nice and quick for me. Simply place a straight pin through one of the two beads nearest the top.

Then insert into the top of the pumpkin. If you are doing a loop like me, place the pin where two lines converge, otherwise just place it at the top of a single line. If you have any trouble getting the pin to go all the way in, use a marker or pen bottom to help it along.

Just do this all the way around and you’re finished! I added an extra loop of beads around the top of the stem to conceal the entry points, as well as some ugly spots, but this is totally optional. The straight pins are so small, they can barely be seen at all.

Furniture Tacks

The next pumpkin took a little bit more time, but was still really easy. I’ve always had a thing for using furniture tacks where they don’t belong. In the case of my white pumpkin I saw the perfect opportunity. Just be sure to measure here. You will have to give and take a bit with the natural curves, but It will definitely make things easier.
I picked up the tacks at JoAnn Fabrics. If you find it difficult to keep them in a straight line, they also sell them already attached to one another for about $27.

Clary Cutters

For my final pumpkins I decided to do a twist on the Jack-O-Lantern. I really didn’t want to do a face so I opted for a fun design instead. To keep things consistent I picked up some clay cutters in diamond shapes. They also had sets of squares and circles, should you prefer. Next year I will probably do a traced design, but for now I’m pretty happy with how they turned out.
First, I gutted the pumpkins (then I made some Garlic Rosemary Pumpkin Seeds that were absolutely delicious). You have the choice of either going in from the top or the bottom of the pumpkin. Each having its pros and cons. Going in through the top is easier as far as balancing the pumpkin while gutting, while going in through the bottom will leave your end result much cleaner. Either way, it’s up to you. Should you choose to go in through the top, try to make your circle as circular as possible by using measuring tape to hash out where you will make your cut(s).

For both pumpkins I went with the natural lines of the cleavage for spacing. For the larger I did ten larger diamonds in line with both the positive and negative points of the stem at the top, measured 1″ down from the circle made earlier. Again, to keep things consistent be sure to use measuring tape as you go.

Definitely have fun with your design, and don’t freak out about things being too perfect. Unless your pumpkin was grown in a lab, chances are it’s going to be a bit wonky. Work with your pumpkin’s unique shape and things should turn out just fine.

So that’s it! I can now say I got pumpkin carving (and dressing, I guess) out of my system for the year, and kept it fall friendly so I can keep them out later than Halloween. Which is ideal considering I waited until the week before!


No Comments